kaggle 及 conda jupyter 内核准备入门


环境安装和准备

感谢:https://blog.csdn.net/mighty13/article/details/119859242

https://blog.csdn.net/weixin_41524411/article/details/89710097

anaconda + jupyter

1
2
3
4
5
6
7
# 激活虚拟环境
activate xxx
# 安装kaggle
pip install kaggle
# 生成.kaggle文件
# 位置在C:\Users\{用户名}内
kaggle competitions list

获取kaggle.json

  在安装完成kaggle之后,进入Kaggle的个人主页(点击右上角头像),点击Create New API Token,则可创建一个kaggle.json文件,并自动开始下载

​ - 将kaggle.json文件移动到.kaggle文件夹内

安装内核

使用anaconda虚拟环境作为jupyter notebook内核

主要是将python 用作 能在jupyter运行的内核

1
2
3
4
5
6
7
8
# 激活虚拟环境 其中xxx为你的环境名
activate xxx
# 安装jupyter内核包ipykernel
conda install -n xxx ipykernel
# 安装内核 其中foo为虚拟环境的名称,"conda_foo"为内核的显示名称。
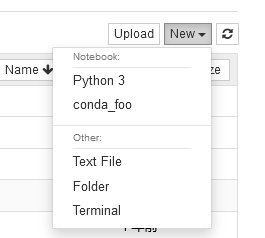
python -m ipykernel install --user --name foo --display-name "conda_foo"
# 验证
Jupyter Notebook

删除内核

1
2
3
4
5
6
# 查看已安装内核
jupyter kernelspec list
# 删除内核 attention: xxx为你内核的名字
jupyter kernelspec remove xxx
# 验证
jupyter kernelspec list